Star Spangled Fourth of July Berry Tarts

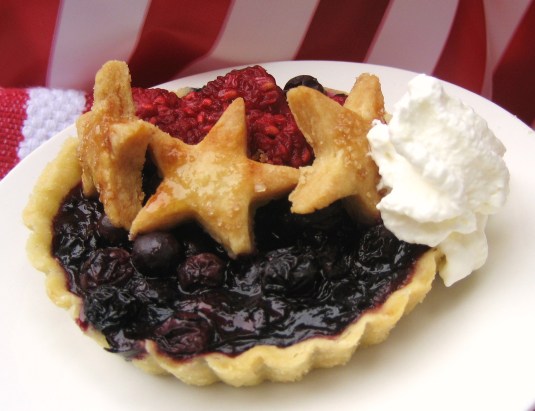
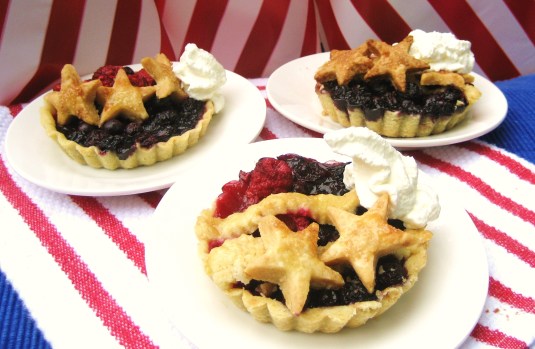
Looking for a stunning dessert to top off your Fourth of July cookout? What could be more patriotic than these starry mini berry tarts?  Raspberries and blueberries bursting under flaky pastry and adorned with freshly whipped cream assure a grand finale to your celebration.

Equipment needed: six 5-inch tart pans with removable bottoms

6-inch round cookie cutter

1 ½-inch star-shaped cookie cutter

Fluted pastry wheel

Ingredients:

Tart dough  (Make two recipes; don’t double recipe):

2 cups all-purpose flour

1/2  t salt

1 T sugar

8 oz. (one stick) unsalted butter, cut in 1 T pieces

4 oz. vegetable shortening, in 1 T pieces

1 yolk from an extra large egg

4 T ice water (approx.)

Raspberry filling

Mix together:

1 pint fresh raspberries

¼ cup sugar

2 T Chambord (raspberry liqueur) optional

2 t freshly squeezed lemon juice

2 T cornstarch

Blueberry filling

Mix together:

1 pint fresh blueberries

¼ cup sugar

2 t freshly squeezed lemon juice

½ t ground cinnamon

1/8 t freshly ground nutmeg

2 T cornstarch

2 T butter

Milk for brushing tarts

Raw sugar for sprinkling tarts

Whipped cream

Procedure:

Place flour in the workbowl of a food processor with metal blade. Add salt and sugar and pulse to mix.  Add butter and vegetable shortening.  Mix using a few quick pulses.  You should still see bits of better and shortening.  Add egg yolk. Pulse again for one second.  Add 3 T ice water around top of dough. Pulse briefly.  Continue to add just enough water to allow dough to hold together when pressed between fingers.  This is the crucial step.  If the dough is too dry it will crumble when you try to roll it out.  If you add too much water, the baked crust will not be light and flaky.  You should still see tiny bits of butter.  Don’t let a ball form.

Dump dough onto a sheet of plastic wrap, form into a disk and refrigerate for an hour or more.

Roll out pastry dough, one disk at a time, to 1/8 inch thickness. Cut out six circles.  Press into tart pans and, using your thumb, press up against inside rims.  Place in refrigerator while proceeding.  Cut out the number of stars you want for decoration with the star-shaped cookie cutter.  These are baked separately from tarts. Brush with milk and sprinkle with raw sugar.  Place on a cookie sheet and bake at 350 degrees until golden brown, about 10 minutes.  Set aside to cool.

Cut a few ½-inch strips of pastry dough with a fluted pastry wheel to use for decoration.

Take tart shells out of refrigerator and fill with berry fillings.  You can fill a shell with one filling  or two fillings side by side.  Dot with bits of butter.  Decorate half of tarts with pastry strips arranged in a parallel fashion.. Brush strips with milk and sprinkle with sugar.  Set tart tins on an aluminum foil-covered cookie sheet and place in a 375 degree oven for about 45 minutes until crusts are lightly browned and berry filling is bubbling. Arrange the baked star cutouts decoratively on tarts. Remove tins. Top with a dollop of freshly whipped cream.

Adapted from Martha Stewart Living, July 2010

Photos by Sweetpaprika
Pineapple Upside-down Cake

pineapple upside cake 2

Pineapple Upside-down Cake

All those upside-down cakes of yore topped with canned pineapple rings with maraschino cherries adorning the centers will seem like a bad memory after you’ve tasted this fresh pineapple version.  Select a pineapple that is fragrant and has a little give when pressed. The subtle tang of the buttermilk and tender crumb are irresistible.    The glistening caramel gives the cake a glorious finish. A dash of dark rum on the finished cake is a delightful touch.

Needed: a 9-inch silicone cake pan, rimmed baking sheet, wide-bottomed light-colored saucepan (such as stainless steel).

Ingredients:

1 cup sugar

1 large ripe pineapple

For the Cake:

1 stick (8 T) unsalted butter, softened

1 cup sugar

2 eggs, room temperature

½ t pure vanilla extract

1 ½ cups unsifted all-purpose flour

1 t baking powder

¼ t salt

½ cup nonfat buttermilk

Procedure— Caramel:

1. To a heavy, wide-bottomed saucepan, add 1 cup sugar.  Don’t use a dark-colored pan as you won’t be able to see the color of the caramel change.

2. Over medium heat let the sugar melt swirling pan but not stirring it.

3. When the caramel reaches a light amber color, remove it from the heat and pour immediately into the silicone pan. Carefully swirl the pan to coat the bottom.  Set aside on a rimmed baking sheet. (This can be done well ahead.)

The Pineapple:

1. Cut the top off the pineapple and a slice from the bottom so the pineapple will sit upright. Quarter the pineapple.

2. Core, peel and slice into ¼” slices.

3. Arrange the slices on top of the hardened caramel, overlapping them with the flat edges pointing upward.  Remember that this will be the top of the cake.

The Cake Batter: Heat oven to 350 degrees.

1. Cream the butter in an electric mixer.  Add the sugar gradually and beat until the mixture is light.

2. Add the eggs one at a time and beat after each addition for 15 seconds.

3.  Add the vanilla extract.

4. Sift the flour, baking powder and salt together.

5. With the mixer on low speed, add half of the dry mixture to the butter mixture. Mix just until the flour disappears.

6. Add the buttermilk and mix again.

7. Add the remainder of the flour mixture and again, mix just until the flour disappears.

8. Scoop large dollops of the batter over the pineapple taking care not to disturb the arrangement of the slices.  Smooth out the batter.

9. Bake until a skewer inserted in the middle comes out clean and the cake is golden brown (about 50 minutes).

10. Run a knife between the cake and edge of the pan.  Set a serving platter on top of the pan and invert.  Carefully lift off the cake pan.

Photo by Michael Kirigin

Adapted from a recipe by Margery K. Friedman

Rosy Grapefruit Sorbet

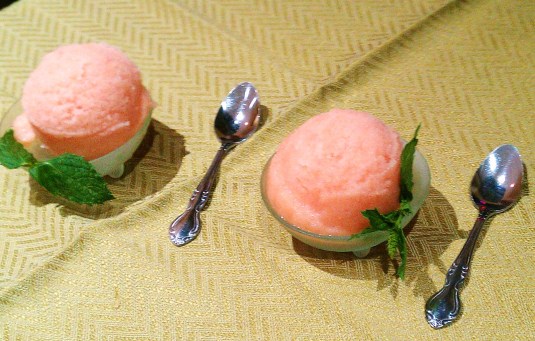
IMAG0751Sugar tames the tartness of the grapefruit in this refreshing palate-cleansing sorbet.  With only two essential ingredients, it is a breeze to make. (You’ll need an ice cream maker.)  Should you come across a sorbet recipe with water added to the juice, drop it immediately from your browsing.  A sorbet must be intense with fruit flavor and there should be no watering down.

Ingredients (Makes about a quart)

4 large Ruby Red grapefruits

¾ cup granulated sugar

2 T grapefruit vodka*

2 T Campari bitters*

Directions

1. Squeeze juice from grapefruits.  Strain.  You should have about 3 cups of juice (If you have more, add more sugar accordingly.)

2. In a small saucepan mix sugar with ½ cup of juice. Heat and stir just until sugar is dissolved.

3. Cool and add to remainder of juice.  Stir in vodka and bitters.

4. Chill in refrigerator overnight or until cold.

5. Prepare in ice cream machine according to manufacturer’s directions.  This should take about 20 minutes.

6. Scoop into a container with a tight-fitting lid and place in freezer.

* The vodka will prevent the sorbet from freezing hard.  It’s not essential if you’re going to eat it the same day, but otherwise highly recommended.  The Campari marries well with the grapefruit flavor, slows down the hardening and gives the sorbet a lovely rosy color.

You can, of course, use unflavored vodka, but I always look for ways to intensify flavor.

IMAG0755

Photos by Michael Kirigin

Hand-Dipped Chocolate Strawberries

Hand-Dipped Strawberries

Photographer Bill Brady

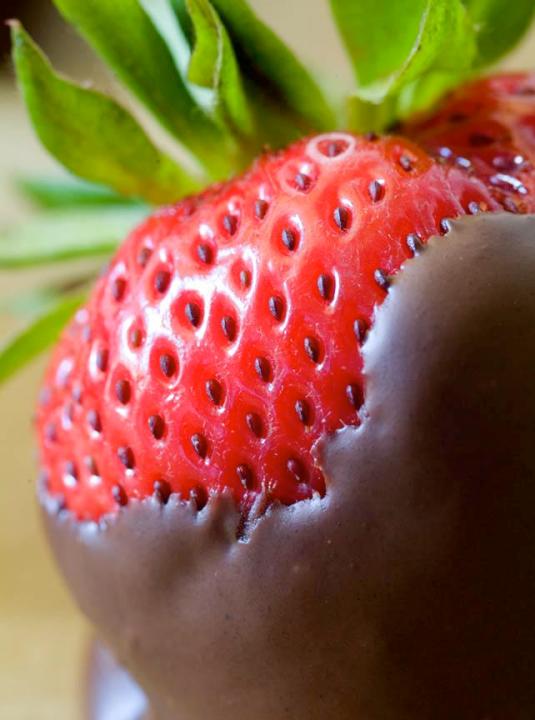
Of course you can buy a box of candy, but where’s the love in that?  These hand-dipped chocolate strawberries proclaim love with their voluptuous coating and perfect strawberries and they can be created in an hour. The procedure may look long because I’ve provided detailed, can’t-fail directions but notice there are only two ingredients. Of course, you can use white chocolate or milk chocolate and you can roll them in nuts, but this is the way I like them best, simple and luscious.

Ingredients

1 lb. fresh strawberries (preferably with stems)

16 oz. high quality dark chocolate* in wafer form or chopped into small pieces

Procedure

1. Gently rinse strawberries.  If you have a hair dryer with a no heat setting, use it the dry the strawberries. Lay them out on a towel and move them around as you dry them.  This technique works perfectly.  Otherwise, just pat them dry gently with an absorbent cloth.  They must be perfectly dry.

2. Melt chocolate in the top of a double boiler.  I improvise a double boiler by placing a pan that fits inside a larger pan but does not touch the bottom.  Fill the bottom pan with just enough water so that it doesn’t touch the upper pan.  Bring the water to a boil. Turn off the heat.  Place chocolate in the upper pan.

3. The chocolate will melt.  Give it time and stir from time to time. Let it reach a temperature of 88 degrees.**

4. Line a baking sheet with parchment paper or a silicon sheet.  Set aside.

5. Take the pan of melted chocolate out of the larger pan and, holding each strawberry by the stem, dip it into the chocolate. Roll it around so that the strawberry is nicely covered. Hold it over the pan until it stops dripping.  You can use a spoon to smooth the bottom.  Set it on the parchment paper.  If the chocolate is still dripping, you will wind up with a “foot” on the strawberry.  Not good.***

6. The chocolate will set if placed in a cool area.  You can place the baking sheet in the refrigerator but only long enough for the chocolate to set.  Left in the refrigerator the chocolate will take on an opaque finish instead of the glossy color you want.

* I order chocolate online from World Wide Chocolate http://www.worldwidechocolate.com/?gclid=CObR0d-_sLgCFcyj4Aod-DkAdA  They offer gourmet chocolate at discount prices.

** If you wish to temper the chocolate for the most professional look, directions can be found at

http://candy.about.com/od/candybasics/ht/temperchoc.htm

***Should you have leftover chocolate, toss in some coarsely chopped walnuts or pecans and spoon out clusters.  They, too, will set up on parchment paper.

Strawberry Sherbet


Strawberry SherbetThis strawberry sherbet is light, fresh and not too sweet—the perfect refreshment for warmer weather.  It will rival any brand of store-bought in the grocery store.  Lush, silky and rosy-hued, this stunning dessert is easy to make, but you do need an ice cream maker.  Small freshly picked strawberries are featured in most farmers markets now so you can pass on those large flavorless cross-country imports.

There seems to be a bit of confusion between sherbets and sorbets. Sherbets contain cream or milk and have a silky texture. Sorbets do not contain cream or milk and have an icy, yet refreshing, texture.  Both are best when they contain no water.

This sherbet has an intense strawberry flavor, not too sweet and not too tart and involves no cooking.  I think you’ll love it.fresh strawberries

Ingredients

2 cups hulled strawberries

1/2 cup sugar

2 cups whole milk

2 t freshly squeezed lemon juice

2 T vodka

Directions

1. Mix together strawberries and sugar.  Let sit for ten minutes or so until strawberries absorb sugar and begin to exude their juice.

2. Place in food processor and puree.

3. Press through a sieve to strain out pits.

4. Stir in milk, lemon juice and vodka.

5. Refrigerate at least two hours (or overnight) until mixture is thoroughly chilled.

6. Pour mixture into the container of an ice cream maker and freeze according to the manufacturer’s instructions.

Note: the vodka will prevent the sherbet from freezing hard.

Sherbet photo by Bill Brady

Strawberry photo by sweetpaprika

Chocolate! Chocolate! Chocolate!

Chocoholic Heaven: Chocolate Mousse

Is there a more romantic dessert than chocolate mousse?  Simple, yet elegant.  The quintessence of velvety richness.  Topped perhaps with a dollop of freshly whipped cream and a few chocolate shavings.  However, it can certainly stand on its own.  Many identify Julia Child’s chocolate mousse as the classic version and true, it has a unique mouthfeel that is airy, almost foamy.  However, it uses eggs that are never cooked and, even though there is only a tiny chance of salmonella, I prefer a safer version that is rich and velvety.

There are just a few ingredients so the quality of the chocolate plays an important role in the outcome. Also, I suggest a bittersweet or semisweet chocolate containing between 50 and 60% cacao.  A higher percentage will produce a drier result.  Be sure to serve the mousse in pretty dessert goblets. And ladies, if you have ever doubted that the way to a man’s heart is through his stomach, you’ve never served him chocolate mousse.

Ingredients (8 servings)

2 cups heavy cream

4 yolks from large eggs

3 T superfine sugar

1 t pure vanilla extract

7 oz. bittersweet chocolate, melted

Directions

1. In a small saucepan heat 2/3 cup cream just until it starts to steam.

2. Whisk together egg yolks and sugar in a separate bowl.

3. Slowly add half of the hot cream to the egg yolk mixture until thoroughly combined.

4. Add the warm egg-cream back into the hot cream in the saucepan and cook over low heat, stirring constantly until the mixture reaches 165 on a digital thermometer.

5. Off heat, stir in the vanilla and melted chocolate.

6.  Chill thoroughly.

7. Whip remaining 1 1/3 cups cream in a separate bowl until stiff peaks form.

8. Stir about 1/3 of the whipped cream into the chocolate custard and then gently fold in the remainder until no streaks appear.  Serve chilled.

(Adapted from a recipe by Rebecca Franklin)

Chocolate Reveries

by Victor Ribaudo

Some of my fondest gastronomic memories involve chocolate.  I’d venture to guess that I’m not alone here.  What is it about chocolate that causes our hearts to skip a beat when it’s presented to us in its many sumptuous forms?  Nay . . . even the thought of chocolate for some can trigger and inner longing that may lead to heady, euphoric ecstasy – causing faintness of breath!  OK, maybe I exaggerate, as I am wont to do.  (After all, I am Italian.  It’s genetic.)  The point is chocolate to most of us is a luxury we cannot do without.  I’m in that league.

When I was a child, my grandmother often made me chocolate sandwiches.  Yes, you read correctly.  She’d take crusty Italian bread, toast it in the oven, and then sandwich a chocolate bar in between the slices.  She’d press it with her hands, and the heat from the toasted bread sufficiently softened the chocolate bar to a silky consistency.  I was in heaven.  And I wanted more of it.  She also prepared something called cuccia for me on St. Lucy’s Day (December 13th).  This was a pudding made from cooked wheat berries, milk, candied fruit and chocolate.  Oh yes, it was as good as it sounds.  There were usually lots of wheat berries left over.  These were served to me the rest of the week for breakfast, swimming in warm chocolate milk.  Beats cold cereal any day.  Of course, I was often treated to the chocolate candies, cakes and brownies every kid begs for at the supermarket.  What can I say . . . they spoiled me!

At Easter . . . well, is there anything more heartwarming than a chocolate bunny?  My Mom procured the best, of course, from a chocolatier shoppe on 86th Street in Brooklyn.  The ears were solid, and so they were my preference.  And let’s not forget the chocolate drives at school.  My aunts and uncles would buy boxes of those bars from me, only to hand them right back for my sister and me to enjoy.  I especially loved the smell that wafted from the boxes as I opened them.  Those bars of chocolate were ridiculously delicious – melt-in-your-mouth velvetiness and studded with tons of roasted almonds to boot.  Amazing!

So you see, I was predestined to love chocolate.  Naturally, as my culinary tastes grew more sophisticated, I searched for even more heightened chocolate experiences.  Not hard to find.  Every fine restaurant has at least two chocolate creations on the dessert menu.  My first foray into that world began with chocolate mousse.  (Please check out Phyllis’ recipe above (it’s outstanding.)  Then I was enamored by the molten chocolate cake.  Who could resist that hot chocolate lava oozing from a petite cake.  Looks innocent until your fork breaks the crust. Then watch out!  Black Forest Cake also became an uncontrollable passion for me.  After all, chocolate and cherries were destined to fall in love.

And so it goes.  Double, triple, quadruple chocolate cakes and pastries…love them all.  Hot or cold chocolate puddings…bring them on.  Chocolate covered donuts…hot fudge sundaes…chocolate chip cookies…chocolate dipped strawberries…chocolate liqueurs.  Can’t get enough of them.  Extravagant?  By all means.  I mean, we must live to eat.  That’s my motto.

Want someone to fall in love with you?  Bake something chocolaty for them.  If the recipe calls for hard baker’s chocolate, be sure to melt it in a double boiler. Easy.  Just place a mixing bowl over simmering water, and stir continuously until the desired consistency is achieved.  Then you’re good to go with whatever recipe you have on hand.  Watch out though;  it’s intoxicating.  The person you serve it to might take this as a proposal of marriage.  The rest is up to you.

Photographer Bill Brady
Written by Victor Ribaudo
Recipe by Phyllis Kirigin
Food Stylist BrianPreston Campbell
Blog syndicated at the datingsymbol.com

  1. Chocolate … in all it’s glory! Fantastic photos and lovely memories!
    Debbie :-)

  2. I love your pictures with all of the light. And I also love your chocolate mousse recipe, keep up the great work!!
    Charlie, 12 year old food blogger

  3. carine says:

    Oh…chocolate…Glorious chocolate….You made my day…thanks~

  4. Beautiful photos. I have a hankering for some chocolate now.

Holiday Rum Cake

How about a lovely aromatic rum cake for the upcoming holidays?  This is basically a pound cake yet redolent with just the right amount of dark rum to pique your palate.  Should you want a more intense confection, poke a few small holes in the finished cake and brush on a little more rum.  Adorn with a dollop of freshly whipped cream.

Ingredients

2 ½ cups all-purpose flour

1 cup granulated sugar

1 cup light brown sugar, packed

½ t salt

2 sticks unsalted butter, softened

4 large eggs

3 yolks from large eggs

2 t vanilla extract

½ cup quality dark rum

Whipped cream for topping

Directions

1. Adjust rack to lower third of the oven and heat to 325 degrees.

2. Place flour, sugar, baking powder and salt in the bowl of a stand mixer and affix paddle attachment.  Add butter and beat on lowest speed until well mixed.

3.  In another bowl, whisk together eggs, egg yolks, vanilla and rum, mixing well.

4. Add 1/3 of the wet ingredients to the stand mixer bowl and beat at medium speed for 2 minutes.  Scrape down bowl.

5. Add another 1/3 to the mixer and beat for 2 minutes, scraping down bowl again.

6. Add final 1/3, beat and scrape as before.

7. Scrape batter into a buttered and floured 12-cup Bundt pan, smooth top and place in oven.

8. Bake for about 60 to 75 minutes or until a toothpick inserted between edge and center of pan comes out clean.  There may be a few dry crumbs attached.

9. Let cool on a rack for about 10 minutes, then invert  and release from pan to continue cooling.  Add a dollop of whipped cream to each serving.  Store by wrapping in plastic wrap and then aluminum foil.

Photos by Michael Kirigin

A Perfect for Passover Cheesecake

This light, ethereal cheesecake is perfect Passover fare.  In addition to cream cheese, this Italian version includes sour cream for tang and ricotta for lightness.  The citrus zest is a must.  Cake meal easily replaces the traditional wheat flour.

Ingredients

1 lb. whole milk ricotta cheese

1 lb. sour cream

1 lb. cream cheese (or mascarpone)

1 ½ cups granulated sugar

1 stick sweet butter, melted

Pinch of salt

3 large eggs

½ cup cake meal, divided

1 T freshly squeezed lemon juice

1 ½ T pure vanilla extract

Finely grated zest from one orange and one lemon

Directions

1. Have all filling ingredients at room temperature.  Grease and coat with 2 T cake meal the bottom and sides of a 9 X 3-inch springform pan.

2. In a stand mixer beat together ricotta, sour cream and cream cheese until well mixed.

3. Beat in sugar and then melted butter and pinch of salt.

4. Add eggs one at a time, beating well after each addition.

5. Add 6 T cake meal, lemon juice, vanilla, and zest, beating until completely mixed.

6. Transfer to prepared pan and bake in a preheated 300 degree oven for one hour.

7. Turn off heat and let cake stay in oven, door closed, for another hour.

8. Remove and let cake cool completely in pan, set on a wire rack.  Cover and refrigerate.  Remove sides of pan before serving and serve slightly chilled.

Raspberry Coulis

In a small saucepan, mash and heat ½ pint of fresh raspberries with 6 oz. raspberry preserves and 1 T Grand Marnier, stirring until syrupy. Strain syrup and mix with ½ pint fresh raspberries.  Serve with cheesecake.

Photo by sweetpaprika


Chocolate Cake with Mocha Buttercream Frosting

This is the cake everyone in my family requests for a birthday cake.  It’s rich, decadent and luscious.  Chef John Clancy taught me how to make the buttercream frosting.  I have scoured my cookbook collection and the Internet for the perfect chocolate cake.  This is as close as I have come.

I have made two changes from Christopher Kimball’s chocolate cake in The Cook’s Bible.  First I have substituted an extra ¼ cup of cocoa for ¼ cup of flour to make it more chocolaty.  Secondly,  I have used a technique I learned from cake decorator Scott Woolley for helping to assure a moist cake.  Instead of allowing the cake to cool off when removed from the oven and thereby losing moisture, he wraps the layers immediately in aluminum foil and places them in the freezer.  This also makes frosting the cake easier as there are no loose crumbs.

Chocolate Cake

Ingredients

1 ¼ cups cake flour

¾ cup unsweetened Dutch process cocoa

2 t instant espresso powder

¼ t baking powder

½ t baking soda

½ t kosher salt

12 T unsalted butter, softened

1 ¼ cups sugar

2 eggs, room temperature

1 egg white, room temperature

1 ½ t vanilla extract

1 cup buttermilk

Procedure

1. Grease the bottom of two 8-inch baking pans.  Line with parchment paper.  Grease paper (I use butter) and flour pans.  Turn pans upside down and lightly tap  to remove excess flour.

2. Preheat oven to 350 degrees.  Place oven rack in the middle position.

3. Sift flour, cocoa, instant espresso, baking powder, baking soda and salt onto a sheet of waxed paper.

4. Add butter to the bowl of an electric mixer and beat for 1 minute or until light-colored.

5. Add sugar gradually and beat on medium-high speed for 3 minutes until mixture is very light-colored and fluffy (scrape down 2 or 3 times).

6. Add whole eggs and egg white one at a time, beating for 20 seconds after each addition.  Add the vanilla and beat for 10 seconds.

7. Add the flour mixture in three parts alternately with the buttermilk.  Beat on low speed after each addition and scrape down the sides of the bowl with a rubber spatula.  Do not overbeat.

8. Pour batter into pans and bake 25-30 minutes.  Test for doneness by inserting a toothpick.  It should come out clean.

9. Now here’s the part that might surprise you.  Don’t let the cake cool. Instead, wrap well in aluminum foil and place in freezer.  This will help to insure a moist cake that will be easy to frost.

Mocha Buttercream Frosting

Ingredients

¾ cup milk

3 egg yolks

1 ¼ cups confectioners sugar

¾ lb. unsalted butter (3 ticks) softened but cold

2 T instant espresso

Procedure

1. Place the egg yolks and sugar  in a heavy sauce pan and with a wooden spoon, mix them together until well blended.

2. Put the milk in a small saucepan and heat it over medium heat until bubbles form around the edge of the pan.

3. With a wire whisk, beat hot milk gradually into sugar mixture.  Cook on low heat, stirring with a wooden spoon until mixture is thick enough to coat a spoon.*

4. Place the hot yolk mixture in the bowl of a stand mixer.  Beat on high speed until double in volume and down to room t temperature.  Add the instant espresso.

5. Turn the mixer down to medium speed and add the butter, 2 tablespoons at a time.**

6. After all the butter has been added, turn the mixer up to high speed and beat for about 2 minutes until the buttercream becomes light in texture and forms soft peaks.

7. Remove cake layers from freezer.  Place one layer on the pan it was baked in turned upside down.  The cake and the pan will line up perfectly thereby allowing you to frost the sides and transfer the cake to a platter without any mess.  Spread frosting on the top of the layer.  Then place the top layer on. Spread frosting on the top of the cake and then the sides.  Allow the cake to rest in the refrigerator for at least 2 hours.

Optional: Make a syrup of 1/3 cup cold water and 3 T sugar. Stir and cook until sugar dissolves, 4 to 5 minutes.   Add 2 T Amaretto or Kahlau liqueur to syrup and brush on cake layers.

*The way I tell that the mixture is thick enough is that it begins to thicken on the bottom of the pan.  At that instant, scrape it into bowl of mixer.

**At this point the frosting will look gloppy, to use a technical term, but fear not.  It will come together and become glossy when beat at high speed.

Photo by sweetpaprika

Cherry Pie with Fresh Tart Cherries

With fresh tart cherries appearing in the markets,  I just had to move my cherry pie post to the head of the class. I hope you love it as much as I do.

IMG_1189

There they were, glistening like the crown jewels, at this week’s farmers’ market.  Who could resist?  I couldn’t.  Plump, dead ripe, sour cherries,  the beginning of a succulent cherry pie.  Not frozen, not jarred, not canned nor, in my opinion, not sweet cherries, but tart.  If you ever wondered how cherry pie achieved its status in American food lore. this will clarify it all.

Pitted cherries

Dough

1 1/2 cup all-purpose flour

½ t salt

2 T sugar

8 T unsalted cold butter cut into 1 T slices (1 stick)

2 T Crisco

3 to 4 T ice water

Pulse flour, salt and sugar in food processor until mixed.  Scatter butter  over flour mixture and pulse briefly. Add Crisco. Pulse again very briefly.  You should still see tiny bits of butter.  Pour 3 T ice water around bowl of processor. Pulse until dough holds together between thumb and fingers.  Add another tablespoon, if necessary, but don’t let ball form.  Place dough on work surface, pat together and press outward with heel of hand to incorporate butter into flour.  (Frissage)   Form into two 6-inch disks, wrap in plastic wrap and refrigerate for at least ½ hour.

FillingIMG_1212

3 pints fresh tart cherries

1 cup blueberries

1 cup + 1 T sugar

4 T instant tapioca

¼ t salt

1 t fresh lemon juice

1/8 t almond extract

1/2 t vanilla extract

1 T butter

egg wash of 1 yolk and 1 T milk

raw sugar

Pit cherries. Place in a 5-quart Dutch oven along with blueberries, sugar, tapioca, salt, lemon juice, almond extract and vanilla extract.  Heat and stir on stovetop until sugar and tapioca are dissolved.  Cool.

Roll out one disk of dough to a 12-inch round and fit into a 9-inch pie pan.  Trim to a 1-inch overhang.  Roll out second disk and cut into ten ¾-inch strips. Spoon filling into pie tin.  Arrange bits of butter on top.  Brush rim of pie dough with egg wash.  Place five strips of dough across pie at roughly ¾-inch intervals.  Place the other five across pie at an angle revealing diamond-shaped openings.  Press lightly at rim to adhere strips to rim.  Pinch off overhang of strips.  Then fold overhang of bottom crust over strips and flute edge. Brush strips and fluted edge with egg wash and then sprinkle raw sugar on dough.

Line a rimmed baking sheet with aluminum foil and place on bottom shelf of oven to catch any drips.  Then bake pie in lower third of oven at 425 degrees for 15 minutes.  Turn oven down to 325 and bake for 30 minutes or until crust is lightly browned and juices bubble.  Cool thoroughly.  Serve with, what else, a big scoop of vanilla ice cream.

Photos by sweetpaprika

Previous Older Entries